This will get them through their everyday work, so why take the next step, or go on the next Inventor training course? During this post I am going to be looking into the benefits of our Inventor training courses after the essentials covered in our Part 1 course, and how Part 2 will allow you and your company to achieve more.
Inventor’s typical modeling technique will allow the majority of users to produce the model and drawings that they are looking for, but for many the leading questions are: Is there a more productive way of doing this? And what else can I do with my model?
Inventor’s more advanced features, that are covered during our Inventor Part 2 training, cover a range of areas and environments, and will allow you to move your models to the next stage. What I mean by ‘the next stage’ includes different methods such as parameter modeling, surface modeling, and using Bolted Connections and Frame Generator. Also creating variations of models by using iParts and iAssemblies, then publishing them to the Content Center. Models will then have different capabilities and can be taken further than just producing a drawing. Utilizing some of these methods will increase productivity in a number of ways such as reducing modeling repetition by increasing reuse of similar models and improving modeling techniques to create more complex shapes.
Inventor is classified as a ‘feature based parametric modeler’, meaning that whenever a new feature is created it stores the information, which can then then be driven from within the parameters dialogue box. When used to its full effectiveness the parameter tool can be very powerful. Whole model dimensions can be altered through the changing of one value, this value can also be picked from specified lists that you have created. This will benefit your company as well as the customer, depending on what variant of the model they are looking for they can preview designed changes once they have access to the model. Parameters can also be linked to an excel document so non-Inventor users can start to alter models direct from the spreadsheet.
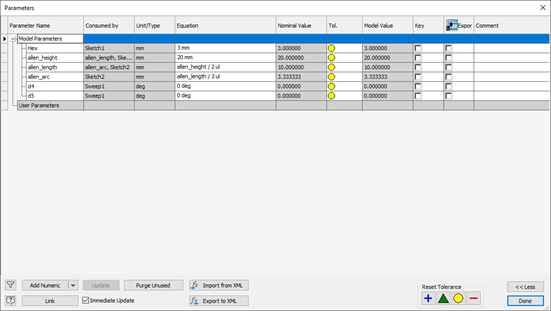
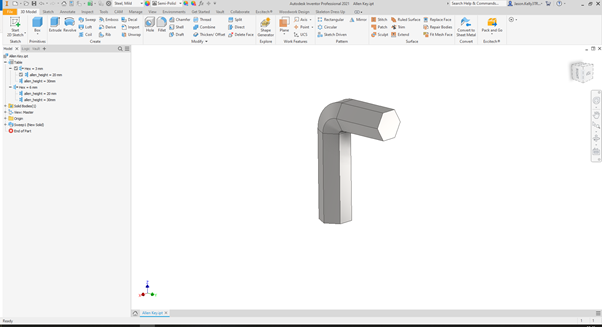
Using existing models and parameters can allow you to create new components of files all with slight variations. This capability lies within the iPart/iAssembly tools with an example being a standard component such as an allen key. This will allow you to create a large number of variant’s in the model that can be used across multiple assemblies without causing issues. Below is an example, the parameters ‘Hex’ and ‘allen_height’ have been given variants so you can generate the models from inside the master model. This works the same for iAssemblies, you can create for example, a cabinet with one drawer, and a cabinet with two drawers and then use them in multiple assemblies choosing which variation you are looking for. Not only do they work with parameters and suppression, but also iProperties, iMates, iFeatures, materials and more.
The iPart and iAssembly tools are huge time savers, as well as keeping everything consistent such as parameters, save locations and file naming. To reproduce 30 models of slight variation, save them, and make sure they all have the same details, increases the amount of time needed to work on them due to the complexity of the model. However, having these option all in one place is of huge time saving benefit. Using these tools can allow you again to move your model to the next level and publish them to the Content Center. The Content Center can be customized to include your generated components, use its capabilities such as Autodrop and make use of the families functionality.
The areas mentioned in this post are just a few of the tools and capabilities covered in our Part 2 Inventor training course.
Once you have gaining a full understanding of the features Inventor has to offer, users can be quick to implement them into pre-existing systems. The main productivity benefit companies will experience from this is automation. Understanding the basics of Inventor will allow you to create the models and drawings but to take it to the next step and automate a process is the key benefit of mastering the software. Once a process is automated it can be very quick to produce models drawings and take relevant data out that is required.
In the second part to this blog, we will take a look at utilizing the different environments that are built into Inventor and how mastering these environments will allow you to complete your workflow with specific tools designed for whatever environment you are working in.

